作者:叶浩田
背景
传统的 Serverless 平台一般都是面向无状态应用的,通过将请求分发到不同的可以自动扩展的函数实例,从而为应用提供极致的弹性、按量付费等能力。然而,针对存在会话概念的应用,传统的 Serverless 平台就不能够在后端有多个副本的情况下,将属于某个会话的请求转发到服务该会话的函数实例,从而该类应用无法在不引入外部存储同步会话状态的情况下运行在 Serverless 平台上。外部存储的引入是有代价的,一方面,某个函数的能扩展的副本数量/会话数量,会受到存储能被多少函数实例并发访问的限制,另外一方面,访问持久化存储/通过网络访问外部存储都会引入额外的开销。函数计算通过 Session 机制的引入,以一种更简单的方式支持了该类应用在 Serverless 平台的运行。
MCP 协议通过标准化的方式,将外部数据源和 LLM 进行了连接,从而 LLM 可以从外部数据源获取数据,也可以对外部的内容产生作用。在之前的文章中,我们介绍了 MCP SSE 亲和的实现,在这篇文章中,我们跟随社区的升级脚步,将 MCP SSE 协议升级为 MCP Streamable 协议,并在函数计算平台上,通过对应亲和类型的支持,让最新的 MCP Server 也可以运行在 Serverless 平台之上。
概念介绍
函数计算:函数计算是事件驱动的全托管计算服务。使用函数计算,您无需采购与管理服务器等基础设施,只需编写并上传代码或镜像。函数计算为您准备好计算资源,弹性地、可靠地运行任务,并提供日志查询、性能监控和报警等功能。
MCP:作为开放标准协议,为 AI 应用构建了通用化上下文交互框架。可以将 MCP 想象成 AI 应用程序的 USB-C 接口。就像 USB-C 为设备连接各种外设和配件提供了标准化方式一样,MCP 为 AI 模型连接不同的数据源和工具提供了标准化方式。
MCP 的三种 Transport:
- Stdio:Client 和 Server 部署在同一台机器上,通过标准输入、输出传输信息。
- MCP SSE:MCP 的 SSE(Server-Sent Events)传输方式是一种基于 HTTP 的单向通信协议,允许服务器通过事件流向客户端推送数据,但需要维护 HTTP POST 和 SSE 两个端点 。
- MCP Streamable HTTP:MCP 的 Streamable HTTP 传输方式则是一种更高效的替代方案,它利用标准的 HTTP POST 和 GET 请求来处理多个客户端连接,旨在解决 SSE 在远程传输中的限制并提供更低的延迟和更好的并发性能 。
为什么你的 MCP 服务应该升级到 MCP Streamable HTTP协议
HTTP+SSE 的传输方式存在缺陷
- 不支持重新连接/恢复: 当 SSE 连接断开时,所有会话状态都会丢失,需要客户端重新建立连接并初始化整个会话。例如,正在执行的大文档分析任务可能会因为不稳定的 WiFi 而完全中断,迫使用户重新开始整个过程。
- 服务器必须保持长连接: 服务器必须为每个客户端维护一个长时间的 SSE 连接,当大量用户并发时,这会导致资源消耗显著增加。当服务器需要重启或扩展时,所有连接都会中断,这对用户体验和系统可靠性产生负面影响。
- 服务器消息只能通过 SSE 传输:即使对于简单的请求-响应交互,服务器也必须通过 SSE 通道返回信息,这会带来不必要的复杂性和开销。由于需要维护长时间的 SSE 连接。
- 基础设施兼容性限制许多现有的网络基础设施,如 CDN、负载均衡器和 API 网关,可能无法正确处理长寿命的 SSE 连接。企业防火墙可能会强制关闭超时连接,导致服务不稳定。
Streamable HTTP 引入关键改进
- 统一端点:移除专用的 /sse 和/message 端点,允许所有通信通过单一端点进行(目前在官方 SDK 中实现为 /mcp)。
- 按需流式传输:服务器可以灵活选择返回标准的 HTTP 响应或将连接升级为 SSE 流。
- 灵活初始化:客户端可以通过一个空的 GET 请求主动初始化 SSE 流。
- 会话可恢复:Streamable HTTP 协议中,只要客户端没有显式删除 Session 或者服务端定期清理掉了 Session,因为连接断开的 Session 都是可以继续使用的。
从一些实验的对比中,可以看到:
- 在连接数上, Streamable HTTP 方案的 TCP 连接数明显低于 HTTP + SSE 方案
- 在不同并发用户数下的请求成功率测试中,Streamable HTTP 的成功率显著高于 HTTP + SSE 方案
- 在性能上,Streamable HTTP 在响应时间方面具有明显优势,Streamable HTTP 的平均响应时间更短,响应时间波动较小,随并发用户数增加,响应时间增长更平,而 HTTP + SSE 的平均响应时间更长,在高并发场景下响应时间波动较大。因此,鉴于 MCP Streamable HTTP 服务的各项改进,更推荐将 MCP 服务升级到 Streamable HTTP 传输。
两者更详细的对比如下:
| 特征 | MCP SSE | MCP Streamable HTTP |
|---|---|---|
| 请求路径 | sse:/sse 或者其他自定义路径消息:/message | /mcp,可自定义,支持 GET 和 POST 方法 |
| 响应传输方式 | SSE 协议+HTTP | 同步 HTTP 请求或者 SSE 协议 |
| 会话保持时间 | 只要 sse 连接存在,会话一直存在 | 直到客户端发送 HTTP DELETE 请求删除 Session 或者服务端超时机制清理 Session |
| SessionID 传递方式 | 通过 url | 通过 HTTP Header 传递 |
| 是否支持会话重连 | 不支持 | 支持 |
| Session 是否可选 | 必须 | 可选,客户端也可以不携带 SessionID 访问 Server |
MCP Streamable HTTP 协议传输解析
客户端主动发送消息到服务端
MCP SSE
在 SSE 方式下,Client 向 Server 发送请求通过/message 端点实现,每个请求是一个异步的 HTTP 请求,如果 MCP Server 接收该请求,则在响应中返回 202 状态码,后续的请求处理结果则会通过 Client 和 Server 维持的 SSE 长链接返回。

在该方式下,请求中会携带 id 信息,在后续 SSE 的响应中,针对同一个请求的 Response,id 设置为相同的值,client 就可以知道响应是针对哪个请求返回的(json-rpc 的约定)。
# client发送给server的请求
POST /messages/?session_id=706c5bb094fe43c89a6cb33fb96f470d HTTP/1.1
host: 127.0.0.1:8000
connection: keep-alive
Accept: text/event-stream
content-type: application/json
accept-language: *
sec-fetch-mode: cors
user-agent: node
accept-encoding: gzip, deflate
content-length: 8{"jsonrpc":"2.0","id":1,"method":"tools/list","params":{"_meta":{"progressToken":1}}}# server的异步返回
HTTP/1.1 202 Accepted
date: Thu, 31 Jul 2025 07:50:51 GMT
server: uvicorn
content-length: 8# sse的返回结果
event: message
data: {"jsonrpc":"2.0","id":1,"result":{"tools":[{"name":"calculate_bmi","description":"Calculate BMI given weight in kg and height in meters","inputSchema":{"properties":{"weight_kg":{"title":"Weight Kg","type":"number"},"height_m":{"title":"Height M","type":"number"}},"required":["weight_kg","height_m"],"title":"calculate_bmiArguments","type":"object"},"outputSchema":{"properties":{"result":{"title":"Result","type":"number"}},"required":["result"],"title":"calculate_bmiOutput","type":"object"}},{"name":"fetch_weather","description":"Fetch current weather for a city","inputSchema":{"properties":{"city":{"title":"City","type":"string"}},"required":["city"],"title":"fetch_weatherArguments","type":"object"},"outputSchema":{"properties":{"result":{"title":"Result","type":"string"}},"required":["result"],"title":"fetch_weatherOutput","type":"object"}}]}
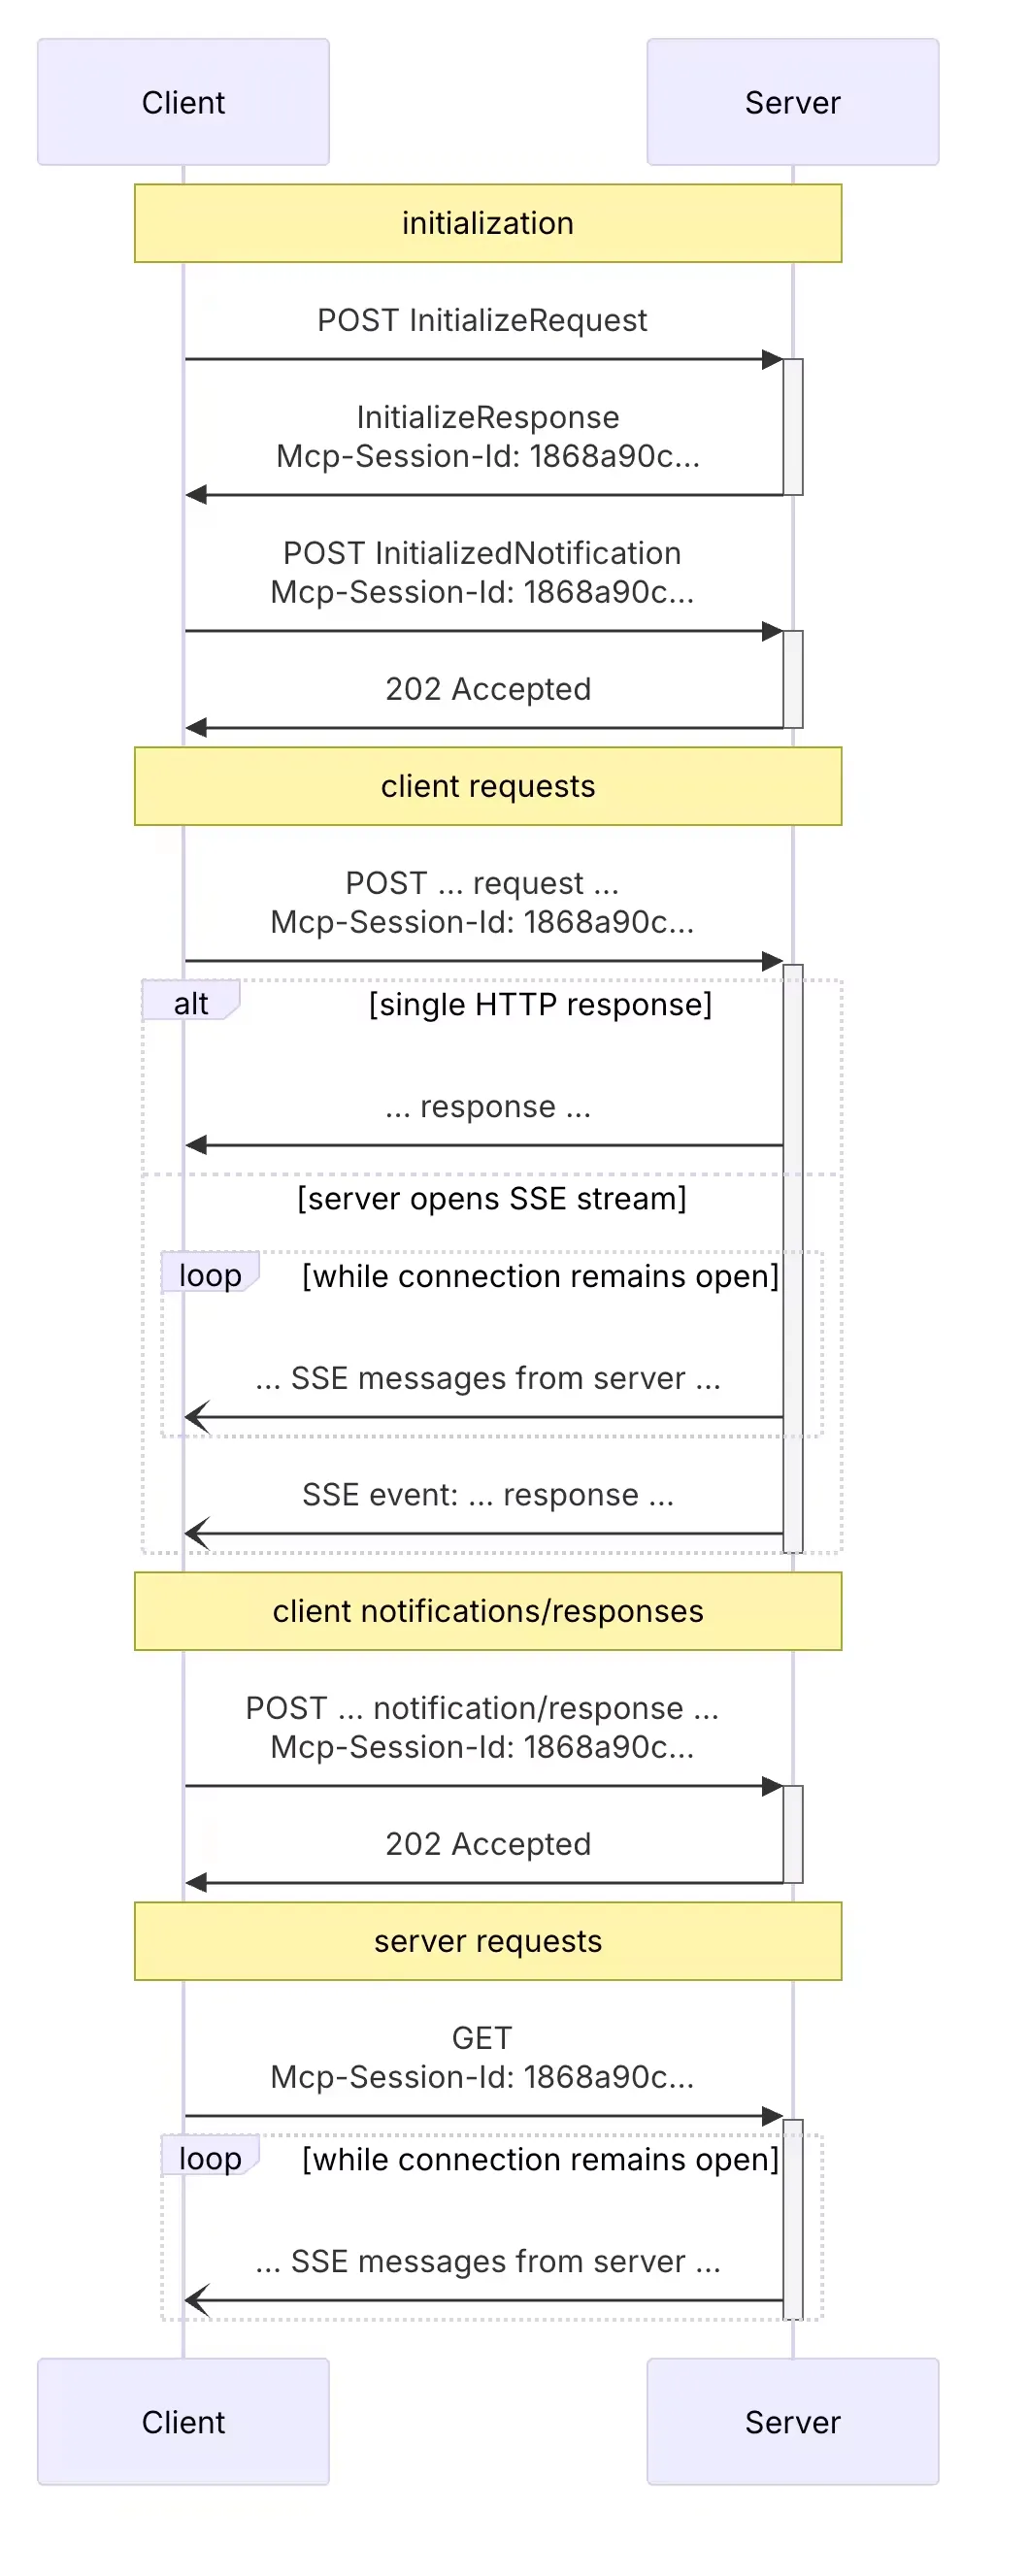
MCP Streamable HTTP
根据协议的约定,可以有如下两种工作的流程
1、同步返回结果:

2、通过 SSE 返回调用结果:

区别
MCP SSE 中 Client 和 Server 始终要保持一个长链接,请求通过新的短连接发起,通过 SSE 长链接返回调用结果。而在 MCP Streamable HTTP 中,针对处理速度比较快或者不能分批返回的调用,Server 可以同步在响应中返回调用结果,针对处理速度比较慢可以分批返回的结果,Server 可以将链接升级为 SSE 连接,将调用结果分批返回(比如其他大语言模型的输出)。在对应的请求处理结束后,与 MCP SSE 仍然保持着 SSE 连接用于后续请求的结果返回不同,Streamable HTTP 会在对应的请求处理结果都通过对应的 SSE 连接返回后,关闭其使用的 SSE 连接,新的请求需要发起新的 SSE 连接而不能复用之前的 SSE 连接。
服务端消息推送机制
MCP SSE
在 SSE 方式下,由于 Client 和 Server 维持着 SSE 的长链接,因此,Server 到 Client 的 Notifications 都可以通过这条 SSE 链接发送。
MCP Streamable HTTP
在 MCP Streamable HTTP 下,Server 如果要发送消息到 Client,是没有办法实现的,因此,协议在/mcp(也可以是自定义的其他路径上)支持了 GET 请求,用于建立 Client 到 Server 的一条 SSE 的长链接。

同时,如果在 GET 请求中携带了 Last-Event-ID 头,则表明该 SSE 连接是针对前述客户端请求的错误回复,MCP Server 可以在该 SSE 流上继续传输之前没有传输完成的消息,实现错误回复。
会话管理
MCP SSE
在 MCP SSE 的官方协议说明中,并没有看到关于 Session 说明,在其他的三方文档和 SDK 的实现中,可以看到有关的约定。
会话管理:
每个 SSE 连接都有唯一的会话标识,在 Message 请求中会包含该会话标识:
- 客户端发起 SSE 连接;
- 服务端通过 Endpoint URL 消息,发送 SessionID 信息;
- 客户短通过 Endpoint URL 发送后续的消息。
抓包的结果也和有关 SDK 的说明吻合:
plain
# 客户端发起SSE连接
GET /sse HTTP/1.1
host: 127.0.0.1:8000
connection: keep-alive
Accept: text/event-stream
accept-language: *
sec-fetch-mode: cors
user-agent: node
pragma: no-cache
cache-control: no-cache
accept-encoding: gzip, deflate# Server返回结果,异步返回endpoint信息
HTTP/1.1 200 OK
date: Thu, 31 Jul 2025 08:51:27 GMT
server: uvicorn
cache-control: no-store
connection: keep-alive
x-accel-buffering: no
content-type: text/event-stream; charset=utf-8
Transfer-Encoding: chunked# SSE返回Endpoint
event: endpoint
data: /messages/?session_id=c6cf551d4d5a4594961b18a8d74998b7# 客户端发送initialized通知
POST /messages/?session_id=c6cf551d4d5a4594961b18a8d74998b7 HTTP/1.1
host: 127.0.0.1:8000
connection: keep-alive
Accept: text/event-stream
content-type: application/json
accept-language: *
sec-fetch-mode: cors
user-agent: node
accept-encoding: gzip, deflate
content-length: 222{"jsonrpc":"2.0","id":0,"method":"initialize","params":{"protocolVersion":"2025-06-18","capabilities":{"sampling":{},"elicitation":{},"roots":{"listChanged":true}},"clientInfo":{"name":"mcp-inspector","version":"0.16.2"}}}# Server返回initialized响应
HTTP/1.1 202 Accepted
date: Thu, 31 Jul 2025 08:51:27 GMT
server: uvicorn
content-length: 8# Client发起后续请求
POST /messages/?session_id=c6cf551d4d5a4594961b18a8d74998b7 HTTP/1.1
host: 127.0.0.1:8000
connection: keep-alive
Accept: text/event-stream
content-type: application/json
accept-language: *
sec-fetch-mode: cors
user-agent: node
accept-encoding: gzip, deflate
content-length: 222{"jsonrpc":"2.0","id":0,"method":"initialize","params":{"protocolVersion":"2025-06-18","capabilities":{"sampling":{},"elicitation":{},"roots":{"listChanged":true}},"clientInfo":{"name":"mcp-inspector","version":"0.16.2"}}}#其他的忽略
MCP Streamable HTTP
一个 MCP “会话”(session)是指客户端与服务器之间映射关系,通过 initialize 阶段发起。一个支持 Session 管理的 MCP 服务需要满足:
- 使用 Streamable HTTP 传输的服务器在初始化时分配一个会话 ID,将其包含 InitializeResult 的 HTTP 响应的头部字段 Mcp-Session-Id 中。
- 会话 ID 应该是全局唯一且密码学安全的(例如:安全生成的 UUID、JWT 或加密哈希值)。
- 会话 ID 必须仅包含可见 ASCII 字符(范围从 0x21 到 0x7E)。
- 如果服务器在初始化过程中返回了 Mcp-Session-Id,则使用 Streamable HTTP 传输的客户端必须在所有后续的 HTTP 请求中包含该 Mcp-Session-Id 头字段。
- 支持会话的 MCP 服务器应该对缺少 Mcp-Session-Id 头字段(除初始化请求外)的请求返回 HTTP 400 Bad Request。
- 服务器可以在任意时间终止会话,之后它必须对包含该会话 ID 的请求返回 HTTP 404 Not Found。
- 当客户端收到一个包含 Mcp-Session-Id 的请求返回 HTTP 404 时,它必须通过发送一个新的不带会话 ID 的 InitializeRequest 来启动一个新会话。
- 当客户端不再需要某个特定会话时(例如用户正在退出客户端应用),它应该向 MCP 端点发送一个带有 Mcp-Session-Id 头字段的 HTTP DELETE 请求,以显式终止该会话。
- 服务器可以对该请求返回 HTTP 405 Method Not Allowed,表示服务器不允许客户端主动终止会话。
兼容性
服务端
服务端如果要保持向后兼容,则必须同时支持两种通信方式:
POST+SSE: 需要有两个端点,/sse 和/messge,分别支持 SSE 和 POST 请求
Streamable Http: 一个新的端点/mcp,支持新版通信方式。
也就是说,服务端要有三个端点,两种通信方式互相独立同时存在。官方不建议将两者融合在一起。
客户端
客户端可以直接尝试将 InitializeRequest POST 到服务器 URL。
如果成功,客户端可以假定这是支持新 Streamable HTTP 传输的服务器。
如果失败且服务端返回 HTTP 4xx 状态代码,则向服务器 URL 发出 GET 请求,期望这将打开 SSE 流并返回 endpont 事件(旧版通信方式中的一个事件)作为第一个事件。当 endpoint 事件到达时,客户端可以假定这是运行旧 HTTP+SSE 传输的服务器,并应将该传输用于所有后续通信。
整体的流程图
FC MCP Streamable HTTP 亲和机制
FC 为 MCP Streamable HTTP 单独增加了一种亲和类型,通过配置该亲和类型,如果函数运行的是 MCP Streamable HTTP 传输的 Server,同一个 Session 的请求都会被转发到会话所属的函数实例上。
会话管理
函数计算作为集调度、计算托管、免运维等特性于一身的 Serverless 服务,可将函数计算核心组件抽象为三部分:
- Gateway:网关层,用户流量入口,负责接收用户请求、鉴权、流控等功能。
- Scheduler:调度引擎层,负责将用户的请求调度到合适的节点和实例。
- VMS:资源层,函数执行环境。
根据 Session 阶段的不同,将 Session 的生命周期分为三部分:会话初始化、会话中以及会话结束三部分分别介绍函数计算在三个阶段如何实现的会话管理。
会话初始化

- Client 根据协议的约定,通过 Initialize 请求,发起 MCP 会话的初始化,网关节点权限校验通过后转发至调度模块 Scheduler。
- 调度模块根据特定标识识别出请求类型为 MCP Streamable HTTP 时,将调度到一台可用实例。
- 当请求和实例绑定时,实例将启动用户代码。
- 用户代码启动完成后,将会将会话信息通过响应的 Mcp-Session-Id 头部返回。
- 在 response 返回经过 Gateway 网关层时,网关层将拦截 Mcp Initialize 请求的首个回包,解析 SessionID 信息,并将 SessionID 和实例的映射关系持久化到 DB。
整体流程和 MCP SSE 亲和的会话初始化阶段相同,区别是提取会话标识的方式不同。
数据链路(会话中)

- Client 完成 MCP Initialize 请求后,将发起 MCP 的后续请求,由于函数计算网关节点无状态, Message 请求将打散到多个网关节点。
- 当 Gateway 收到 MCP 请求,将检查网关节点 cache 中是否存在 MCP 请求携带的 SessionID 亲和信息,如果 cache 中无记录,将回源到 DB 获取相关数据。
- Gateway 通过 cache 或 DB 拿到 SessionID 和实例的绑定关系时,将携带相关信息转发至调度模块。
- 调度模块根据 SessionID 信息,根据历史的会话状态,将请求定向调度到特定实例。
- 后续请求被正确转发到对应的实例,MCP Server 返回 SSE 数据或者是同步的 HTTP 响应。
整体流程和 SSE 是类似的,区别是 MCP Streamable HTTP 中,不区分 Message 消息和管控消息。
会话结束
由于 MCP 本身协议的约定,在 MCP SSE 传输方式下,SSE 连接断开就标识着会话的结束。但是在 MCP Streamable HTTP 场景下,会话在被客户端显示 DELETE 之后,才会结束,因此有如下的会话结束的链路。

链路和会话初始化是类似的,区别是服务端返回之后,函数计算网关会更新 DB 中的会话状态,标识会话已结束。
同时,MCP Streamable HTTP 还在协议层的生命周期的约定的基础上,增加了其他的亲和生命周期约束,包括 SessionTTL 和 SessionIdleTimeout 机制。
SessionTTL:限制 Session 的最大生命周期,TTL 之前,如果客户端没有发起 DELETE 请求结束会话,函数计算调度层会清理过期的会话数据,释放 Session 占用的相关资源。
SessionIdleTimeout:限制 Session 的空闲时间,超过 IdleTimeout 之后,如果客户端没有发起 DELETE 请求结束会话,函数计算调度层会清理过期的会话数据,释放 Session 占用的相关资源。
通过会话层的 DELETE 结束约定以及平台侧的生命周期管理机制,函数计算在 MCP Streamable HTTP 场景下,提供了完善的 MCP Session 的生命周期管理。
Session 配额
引入 Session Concurrency 策略,即结合函数实例的并发度配置,限制每个实例最多绑定 n 个 Session。客户需结合实际业务场景需求配置合理的限制项:
- 亲和模式场景仅限制实例最大并发 Session 数,单实例下所有 session 并发请求数最大 200。
| 配额类型 | 含义 | 是否可调 | 限制 | 消耗规则 | 配额回收机制 |
|---|---|---|---|---|---|
| 单实例最大并发度 | 单实例最多同时处理的最大并发请求数,超出并发上限的请求将路由到其他实例或拒绝限流。 | 不可调整 | 200 | 每个 TCP 连接占用 1 | 请求处理完成后异步释放 |
| 单实例最大并发 Session 数 | 单实例最多同时处理的 Session 数,多 Session 下的请求共享 200 并发配额。 | 可调整 | [1,200] | 每个逻辑会话占用 1 个配额 | Session TTL/Session Idle/ 显式标识会话结束 |
优雅升级/轮转
在 MCP 场景下,数据请求从请求级无状态变为会话级绑定,在 UpdateFunction 后,如果存量 Session 关联的请求路由到新实例,则新增无法识别到 SessionID 信息,返回错误。为解决这类问题,函数计算优雅更新能力从无状态请求级别升级至有状态 Session 级别,在用户更新函数后,存量 Session 关联的请求仍路由到旧实例,新建 Session 请求路由至新实例,优雅实现 MCP 亲和场景下的升级需求。

演示
1、创建一个 Web 函数,亲和类型选择 MCP Streamable HTTP 亲和
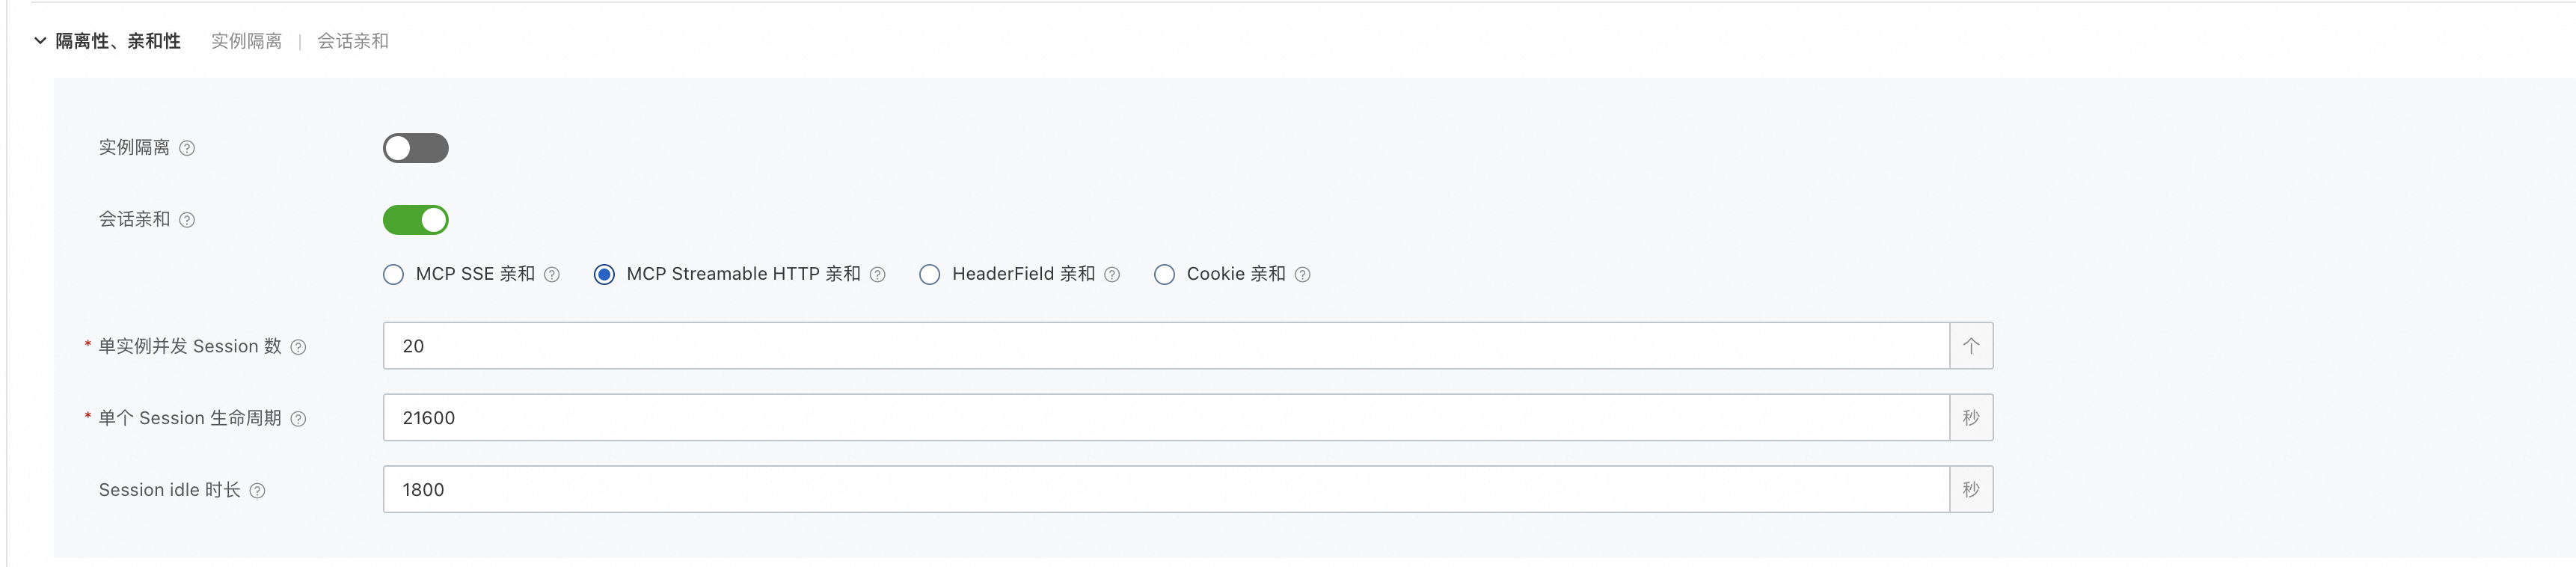
2、函数创建完成之后,选择触发器,配置 HTTP 的访问方式为 Bearer,为该函数的访问入口配置安全措施;
3、本地启动 Mcp Inspector,将 Bearer Token 信息和触发器的地址信息拼接 MCP 的服务端点,填入 Mcp Inspector 的对应配置选项中。(详情可参考官网:https://modelcontextprotocol.io/docs/tools/inspector)

点击 Connect 之后,发起会话,后续就可以使用 MCP Streamable HTTP 提供的服务了。
总结
函数计算跟随 MCP 社区的动态,在 MCP SSE 亲和之后,推出了 MCP Streamable HTTP 亲和,让广大开发者可以将自己的服务升级到 MCP Streamable HTTP 传输,并结合 Bearer 认证,即获得性能上的提升,也更安全的暴露自己的服务。